OpenSSH
OpenSSH
- OpenSSH "OpenSSH is a suite of secure networking utilities based on the Secure Shell protocol, which provides a secure channel over an unsecured network in a client–server architecture."[1]
Install and Configure OpenSSH Server on Windows and (Debian-based) Linux Hosts
I'm sorry if this is confusing to have the two OS's interwoven; however, the configuration is pretty similar between the two of them, so it made sense to me to combine them together. I may separate them at some point, but feel free to send me an email with your thoughts.
1. Install OpenSSH Server on the Host
Windows
- Open Windows Settings and navigate to Optional Features
- Press
Win + Ito open the Settings app. - Go to System > Optional Features.
- Press
- Install OpenSSH Server
- Click on Add a feature at the top of the page (probably).
- In the search box, type OpenSSH Server.
- Select OpenSSH Server from the list and click Install.
Linux
There is a chance openssh-server is already installed.
To verify, run sudo systemctl status ssh; if unit ssh.service could not be found, then you need to install it.
- Install openssh-server (if not already installed)
sudo apt update && sudo apt install openssh-server
- After installation, verify that openssh-server is running
sudo systemctl status ssh
2. Generate an ed25519 Key-pair with a Passphrase on the Client (Windows and Linux)
Why generate a key-pair instead of using a password?
Using a key-pair with a passphrase instead of a password is more secure for several reasons.
- Safety in transit
- Passwords are sent to the server for authentication
- Passwords do not change regularly and it could be sniffed from the network traffic
- Additionally, connecting to a rogue server could intercept the password
- Private keys are used to sign the session identifier, and the public key is used to authenticate it
- The private key never leaves the client, and the session identifier changes with every connection
- Even if the server is compromised, the private key remains safe
- Passwords are sent to the server for authentication
- Passwords are almost universally easier to guess
- You would have to use an incredibly long and complex password to match the security of a key-pair
- Using a passphrase with the key-pair protects you from further compromise
- Even if an attacker gets the private key (stolen laptop, malware, etc.), they would still need the passphrase to be able to use it.
Why ed25519?
- ED25519 is preferred over RSA (even with a 4096-bit key) for several reasons:
- Security: ED25519 is based on elliptic curve cryptography (vs. factoring large prime numbers like RSA) and is considered highly secure with a 256-bit key length.
- Performance: it's faster in both key generation and authentication operations compared to RSA, making it more efficient.
- Simplicity: it uses a fixed key size, simplifying key management.
Generate the key-pair
- Open Preferred Terminal
- Windows: Press
Win + X, then select Windows Terminal (Admin) or PowerShell (Admin). - Linux: Whatever your preferred terminal emulator is, I'm not your mom.
- Windows: Press
- Use
ssh-keygento generate the key-pairssh-keygen -f [file name and location] -t ed25519 -C [Identifying comment]-f [file name and location]Enter the full path and name to the key (e.g.,~/.ssh/TestKey)-t [algorithm]choose the algorithm to use (e.g. rsa, ed25519, etc)-C [Comment]used to identify the key
- When prompted, enter a strong passphrase
- See above; this protects the private key if it is ever compromised.
This results in two files; the private key is just the name of the key-pair (e.g., id_ed25519), and the public key (which we will transfer to the host system) is appended with .pub (e.g., id_ed25519.pub).
1Password, PuTTY, WinSCP (which uses PuTTYgen), can all be used to generate SSH key pairs.
Setting permissions for your new keys is very important; only the file owner should have read/write permissions to the key, and only the owner should have read/write/execute permissions to the .ssh directory.
On the client, run chmod to set the correct permissions:
chmod 600 ~/.ssh/[key name]
chmod 700 ~/.ssh
3. Transfer the Public Key to the Host:
Option 1: SSH Itself
One easy way to copy the public key is by using ssh-copy-id on Linux and a piping the command to SSH on Windows,[2] which automatically imports the key on the target host.
Windows>Linux[3]
type $env:USERPROFILE\.ssh\[key name].pub | ssh [target username]@[target hostname/IP] "cat >> .ssh/authorized_keys"
Linux
ssh-copy-id -i ~/.ssh/[key name] [target username]@[target hostname/IP]
Option 2 (Windows): Manual Copy and Host Public Key Locations
On Windows, there are two locations you could place the public key, depending on the local level of privilege the account has.
- Standard users are able to save keys in the folder
.sshat the root of their user directory (e.g.,C:\Users\Max\.ssh\). - Administrator users must store their public keys in
C:\ProgramData\ssh\.
Copying files directly to these locations may not be possible, so we'll copy it to a temporary directory (and then remove the file later). Windows does not have a default unprivileged tmp folder location, so you can just create one at the root of C (C:/tmp) to avoid problems.
These scripts assume that there is a temporary copy of the key somewhere on your system, which you want to delete after
For a Standard User:
Terminal (CMD)
mkdir -p %userprofile%\.ssh
type C:\tmp\[key name].pub >> %userprofile%\.ssh\authorized_keys
del "C:\tmp\[key name].pub"
Powershell
New-Item -Path $env:USERPROFILE\.ssh
Get-Content C:\tmp\[key name].pub | $env:USERPROFILE\.ssh\authorized_keys
Remove-Item -Path "C:\tmp\[key name].pub"
For an Administrator:
Terminal (CMD)
mkdir -p C:\ProgramData\.ssh
type C:\tmp\[key name].pub >> C:\ProgramData\ssh\administrators_authorized_keys
del "C:\tmp\[key name].pub"
Powershell
New-Item -Path C:\ProgramData\.ssh
Get-Content C:\tmp\[key name].pub | C:\ProgramData\ssh\administrators_authorized_keys
Remove-Item -Path "C:\tmp\[key name].pub"
Option 2 (Linux): Manual Copy and Host Public Key Locations
On a Linux host, public keys are usually stored in the ~/.ssh/authorized_keys file. One key is saved per line, so if you have the .pub public key file on the same system, you can use cat to append the key to the file.
This script assumes that there is a temporary copy of the key somewhere on your system, which you want to delete after.
cat [keyname].pub >> ~/.ssh/authorized_keys
chmod 700 ~/.ssh
chmod 600 ~/.ssh/authorized_keys
rm [keyname].pub
Like with the client, it's critical to set the correct permissions for the host authorized_keys file.
chmod 600 ~/.ssh/authorized_keys
chmod 700 ~/.ssh
4. Configure the Host
Find and modify the config files on the Host
You configure the OpenSSH server through the sshd_config file, located in different places for each OS.
Linux
/etc/ssh/sshd_config
Windows%programdata%\ssh\sshd_config
There are a ton of options here we could change, but to enable the key-pair as authenticators, we need to uncomment[4] and modify two settings.
PubkeyAuthentication- Set this to
yes
- Set this to
AuthorizedKeysFile- Set this to the location of the
authorized_keysfile- For one user,
[home directory]/.ssh/authorized_keys - For all users,
%h/.ssh/authorized_keys, otherwise, enter the path to your home directory where the.sshfolder lives.
- For one user,
- Note for Windows: OpenSSH uses the
/to separate directories by default instead of\like in normal Window's file paths, so if you wanted to enable John's authorized keys, you would useC:/Users/John/.ssh/authorized_keys
- Set this to the location of the
You may want to disable password authentication immediately, but I recommend waiting until after you've confirmed that key authentication is working first.
If you are connecting to a Linux Host, you can make changes to the sshd_config file over an SSH tunnel and restart the SSH service without the tunnel dropping, which is convenient for remote administration.
When you are ready, set PasswordAuthentication (a few paragraphs below the AuthorizedKeysFile setting) to no.
You may want to change the default port from port 22 to an ephemeral port[5] between 49152 and 65535 for an extra layer of security. However, be aware that it's not a one-stop solution, and has some of its own problems.
Pros
- Automated penetration attempts on port 22 fail automatically.
- Casual attackers or malware may miss the custom port.
- Fewer garbage authentication attempts makes real attacks more visible.
Cons
- Not a substitute for the other protections.
- Less-automated port scans will still find it as an open port.
- Increased administration overhead (firewall rules, documentation, etc.)
- Increased chance for port conflicts.
- Some tools assume port 22, and may or may not allow for the port to be changed.
To change the port, search the file for port 22 and replace 22 with whatever port number you want between 49152 and 65535
If the server you're connecting to has Nano, VIM, or some other terminal text editor installed, you can just use your preferred text editor (nano, VIM, etc.) to modify the ssd_config config file over a password-authenticated SSH tunnel.
Once you've saved your changes, you need to restart the SSH service.
Linux
sudo systemctl restart ssh
Windows (run as Admin)
- PowerShell
Restart-Service sshd
- Terminal
net stop sshd && net start sshd
Windows Host: Confirm the SSH Server begins at Startup
Manually:
- Open Services:
- Press
Win + R, typeservices.msc, and press Enter to open the Services management console.
- Press
- Locate the OpenSSH Server Service:
- Scroll down and find OpenSSH SSH Server in the list.
- Start the Service:
- Right-click on OpenSSH SSH Server and select Start.
- To ensure it starts automatically on boot, right-click the service, select Properties, and set the Startup type to Automatic.
Using PowerShell:
Set-Service sshd -StartupType Automatic -Status Running
Configure the Host Firewall
Windows Host
- Open Windows Defender Firewall
- Search for "Windows Defender Firewall with Advanced Security" in the Start menu and open it.
- Create a New Inbound Rule
- In the left pane, select "Inbound Rules."
- In the right pane, click "New Rule...."
- Configure the Rule
- Rule Type: Select Port and click Next.
- Protocol and Ports: Select TCP and specify Specific local ports as
22(or the port you configured insshd_config). Click Next. - Action: Select Allow the connection. Click Next.
- Profile: Choose when the rule applies (Domain, Private, Public). Click Next.
- Name: Give your rule a name, such as OpenSSH Inbound Rule. Click Finish.
Linux Host
Assuming you use ufw as your firewall, you just need to add either ssh to your rules or the port you manually configured.
sudo ufw allow ssh
sudo ufw allow [custom port for SSH]
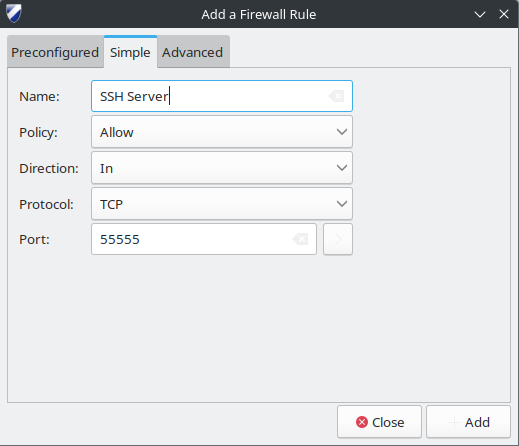
Gufw allows you to add comments to your rules, making a custom ephemeral port a little easier to manage (for example here with port 55555)
5. First connection and troubleshooting
There's a good chance that your first attempt to connect isn't going to work; this is frequently caused by permissions issues.
On your client system, add the key to the ssh authentication agent. When you add the key to the authentication agent, you will be prompted for the key passphrase; once added, however, you won't be prompted for the passphrase until the next reboot.
When you connect to the host, invoke the key-pair by name and using the -vvv option for Verbose mode debugging.
ssh-add ~/.ssh/[key name]
ssh -vvv -i ~/.ssh/[key name] [username]@[host]
Verbose mode will drop a long list of debug alerts going through the entire authentication process, which can be helpful in identifying which certificate is being used for authentication, and where any problems might be occurring. Unfortunately, if the problem is a configuration error on the host side, this won't give you a ton of information.
Gathering logs on the Host
Linux
sudo journalctl -u ssh --no-pager
Windows
Windows Event Viewer>Applications and Services Logs>OpenSSH
On Linux, you will probably see errors about Authentication refused: bad ownership or modes for directory [directory name], and that's where you want to start checking permissions.
Linux Folder Permissions
Verify Permissions
ls -ld /home/[user]
ls -ld /home/[user]/.ssh
ls -l  /home/[user]/.ssh/authorized_keys
Reset home directory permissions to defaults
The key is to prevent other/group write functionality.
Acceptable chmod codes include: 700, 711, 744, 755
(You probably want 700 or 711, but that may cause problems, like if you use Resilio in single-user mode).
sudo chown username:username [home directory]
sudo chmod 755   [home directory]
Lock down the .ssh files
sudo chmod 700  /home/[user]/.ssh
sudo chmod 600  /home/[user]/.ssh/authorized_keys
sudo chown [user]:[user] \
  /home/[user]/.ssh \
  /home/[user]/.ssh/authorized_keys
Metadata
Sources
OpenSSH Server | Ubuntu
How to enable SSH on Linux Ubuntu (Easy step by step guide) - YouTube
Key-based authentication in OpenSSH for Windows | Microsoft Learn
SSH Key Algorithms: RSA vs ECDSA vs Ed25519 - VulnerX
It's 2023. You Should Be Using an Ed25519 SSH Key (And Other Current Best Practices) - Brandon Checketts
How to Create & Manage SSH Keys on Linux Machines - JumpCloud
Tags
Script from Windows 10 OpenSSH Equivalent of ssh-copy-id | Christopher Hart ↩︎
Windows 10 OpenSSH Equivalent of ssh-copy-id | Christopher Hart ↩︎
You can uncomment lines by removing the hashtag/pound sign from the start of the line. ↩︎